 |
 |
|
 |
|
|
|
|
|
|
|
|
|
|
|
|
|
|
|
|
|
|
|
|
|
|
|
|
|
 |
Last page update was 29 Nov 2011 |
 |
|
|
Dashboard
I plan to use a carbon fibre dash from The Kit Car Workshop  . To meet SVA regulations it has a 19mm radius on the lower edge. I've deliberately tried to keep the dash as uncluttered as possible. Before I start cutting up carbon fibre, I made up an MDF template dash.
With hindsight:
Making up a dash in MDF was a good move as until you have the final seating position resolved, you don't know where the instruments need to be placed, to be in clear sight behind a small steering wheel. It's also good to live with the car for a while to make sure you are happy with the position of all the switches. I moved from an MDF dash to a cheap carbon effect plastic one prior to the SVA test. Having lived with the car for 8 months, I then felt confident to fabricate a final one from carbon fibre sheet. This is an expensive material and not one I could afford to make mistakes with.
|
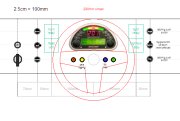
The dash layout is shown in this Microsoft Powerpoint slide. I've tried to make sure that all the switches fall easily to hand and are in obvious locations. My chosen layout also conveniently places the relays close to the required switches (all relays are mounted onto the back of the dash). This design is based upon a 290mm steering wheel which is small but not too small.
|
The main problem I had was was finding quality, similar looking switches, with all the required functions and a suitable current rating. This is easier if you use relays to switch the higher currents and resort to low current switches to enable these relays. I've managed to find some switches to meet my needs from APEM.
Hazards
This is a specialist push-on / push-off switch from Vehicle Wiring Products that supports the fairly complex logic required. An SVA requirement is that the hazard lights work with the ignition switched off. The indicators should only work with the ignition switched on. The hazard lights must over-ride the indicators. It connects all indicators together, breaks feed to existing flasher and switches the feed to hazard flasher. This switch means that two flasher units are required. Ideally I want to mount this out of sight as it is quite large. Uner the centre of the dash would be good.
Fog
On/Off round, locking push switch. This normally switch supplies 21W or ~2A directly. My fog lamp is an LED one drawing very little current. The fog lights must only come on when the dipped or main headlights are enabled. I've taken the fog light feed from the main light switch to acheive this.
Horn
On/Off round, momentary action, push switch which powers the horn relay (hence low current) but, only if the ignition is switched on. The bike engine wiring loom includes a switch (44) for the horn (51) but this I've not used this as my horn is very loud and very high current, so I've used a seperate circuit and a relay.
Ignition
The ignition switch is a high current (20A), On/Off (two-way) key switch. This powers all the switched electrical items (or their activating relays). This key switch provides a basic level of security. It replicates the main switch (1) on the bike. It also stops the engine as the bikes engine kill switch is not present.
Starter
|
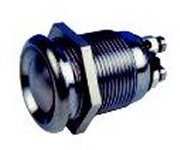
This is a stainless steel, vandal resistant, momentary action, waterproof, starter button. This carries very little current as it only powers the starter relay. The switch is from Maplin . I chose this one as it is roughly the same size as the other switches.
|
This replicates the start switch (60) on the bike.
Indicators
An two-pole On/Off/On toggle switch with black, waterproof, rubber cover. This switch normally has to supply 21W + 21W + 5W or 4A but some of my indicators are LED so the current supplied is low. This switch is mounted sideways to allow left and right indicator control.
Headlights/Off/Side
A double pole, On/Off/On toggle switch with black, waterproof rubber cover. Up enables the head-lights lights and side-lights, middle is off, down is side-lights only. It switches the side-lights on directly in either up or down position. In the up position it also enables the main headlight relay. There is no way to flash the headlights without flicking the main light switch on/off. This feature is not required for the SVA test.
High Beam
On/Off round, locking, blue, push switch which directly enables a change-over relay switching power from the low beam headlights to the high beam headlights. Mounted to the right of the wheel, above the main light switch. This relay can only be energised if the headlights are switched on.
Digidash
Richard used a Digidash unit in his Striker and it is very good. I'm planning to use the new V2.0 Digidash which has all of the warning lights required for SVA on-board. This includes:
- Main beam
- Fog lights
- Cooling fan status
- Ignition
- Neutral selected (aux light)
- Low brake fluid / handbrake on
Steering Wheel
|
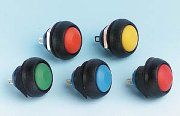
Four coloured switches will be mounted onto the steering wheel to make function selection on the Digidash easier. Since I'm using a quick rack, the steering wheel doesn't actually rotate that much. These switches are connected using a short run of flexible coiled wire (as used on telephone handsets), from the rear of the steering wheel to a hole (with grommit) in the paddleshift mechanism, then down the column into the back of the dashboard. I sourced suitable switches from JPR Electronics but they have a Ł30 minimum order value so I also bought heatshrink and a few other bits at the same time. These are high quality switches, with a nice positive feel and ideally sized for this job. They require a 12mm diameter hole and are 17.5mm in diameter.
|
The paddle shift gear change is also mounted on the steering wheel.
Warning Lights
I'm going to add some 12V warning LEDs on the small panel below the dash. I wanted to show the R1 engine trouble warning light but it seems to be an in-built function of the multi-function meter (42) and cannot be exposed to the outside world.
- Green = Fan on
- Red = Oil level warning light as taken from sump sensor.
- Orange = Communications system is transmitting. This is on a latched push switch so I need a warning light.
These are mounted in recessed panel mounts.
|
|
|
|
|
|
|
|
|
|
|
|
|
|
|
|
|
|
|
|
|
|
|
|
|
|
|
|
|
|
Copyright © Robert Collingridge 2004 |
|
|
|